Product Release Notes, Winter ‘24 Roundup
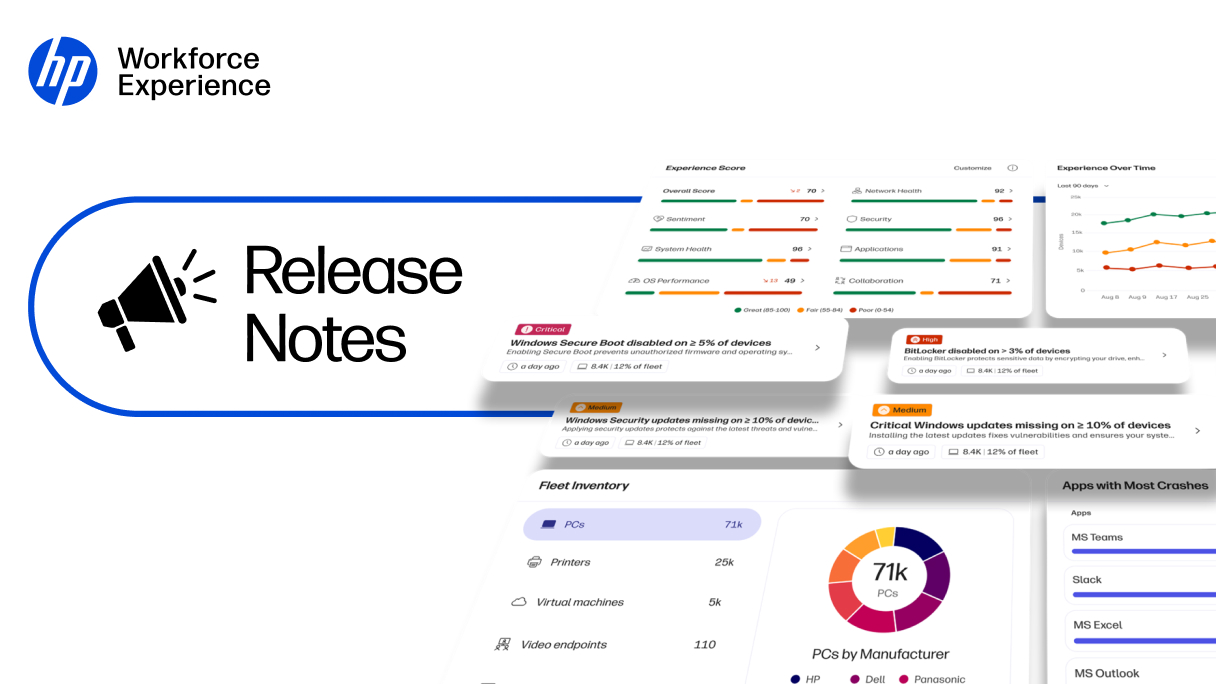
Our latest updates make the HP Workforce Experience Platform (WXP) more intuitive, personalized, and powerful than before. We’ve started the new year with a strong focus on your feedback, delivering major improvements across the platform. We’ve heard what you have been saying about the need for smarter workflows, enhancing reporting capabilities, and deeper insights into device performance, so we’ve made those areas our priority.
This February, we are excited to introduce new features designed to help partners, IT professionals, and employees work smarter, not harder. From a fresh network health overview dashboard to new employee engagement tools, we’ve worked diligently to ensure you get the most out of WXP. Whether it’s through enhanced analytics for better decision-making, improved hardware asset management, or new integrations with popular third-party platforms like Power BI and Tableau, we’ve made it easier for you to streamline IT operations and boost productivity.
Here’s a closer look at the big updates we’ve made, and how they will support you in creating more seamless, efficient digital experiences for your teams and customers.¹
Analytics and Reporting
Network health insights and score
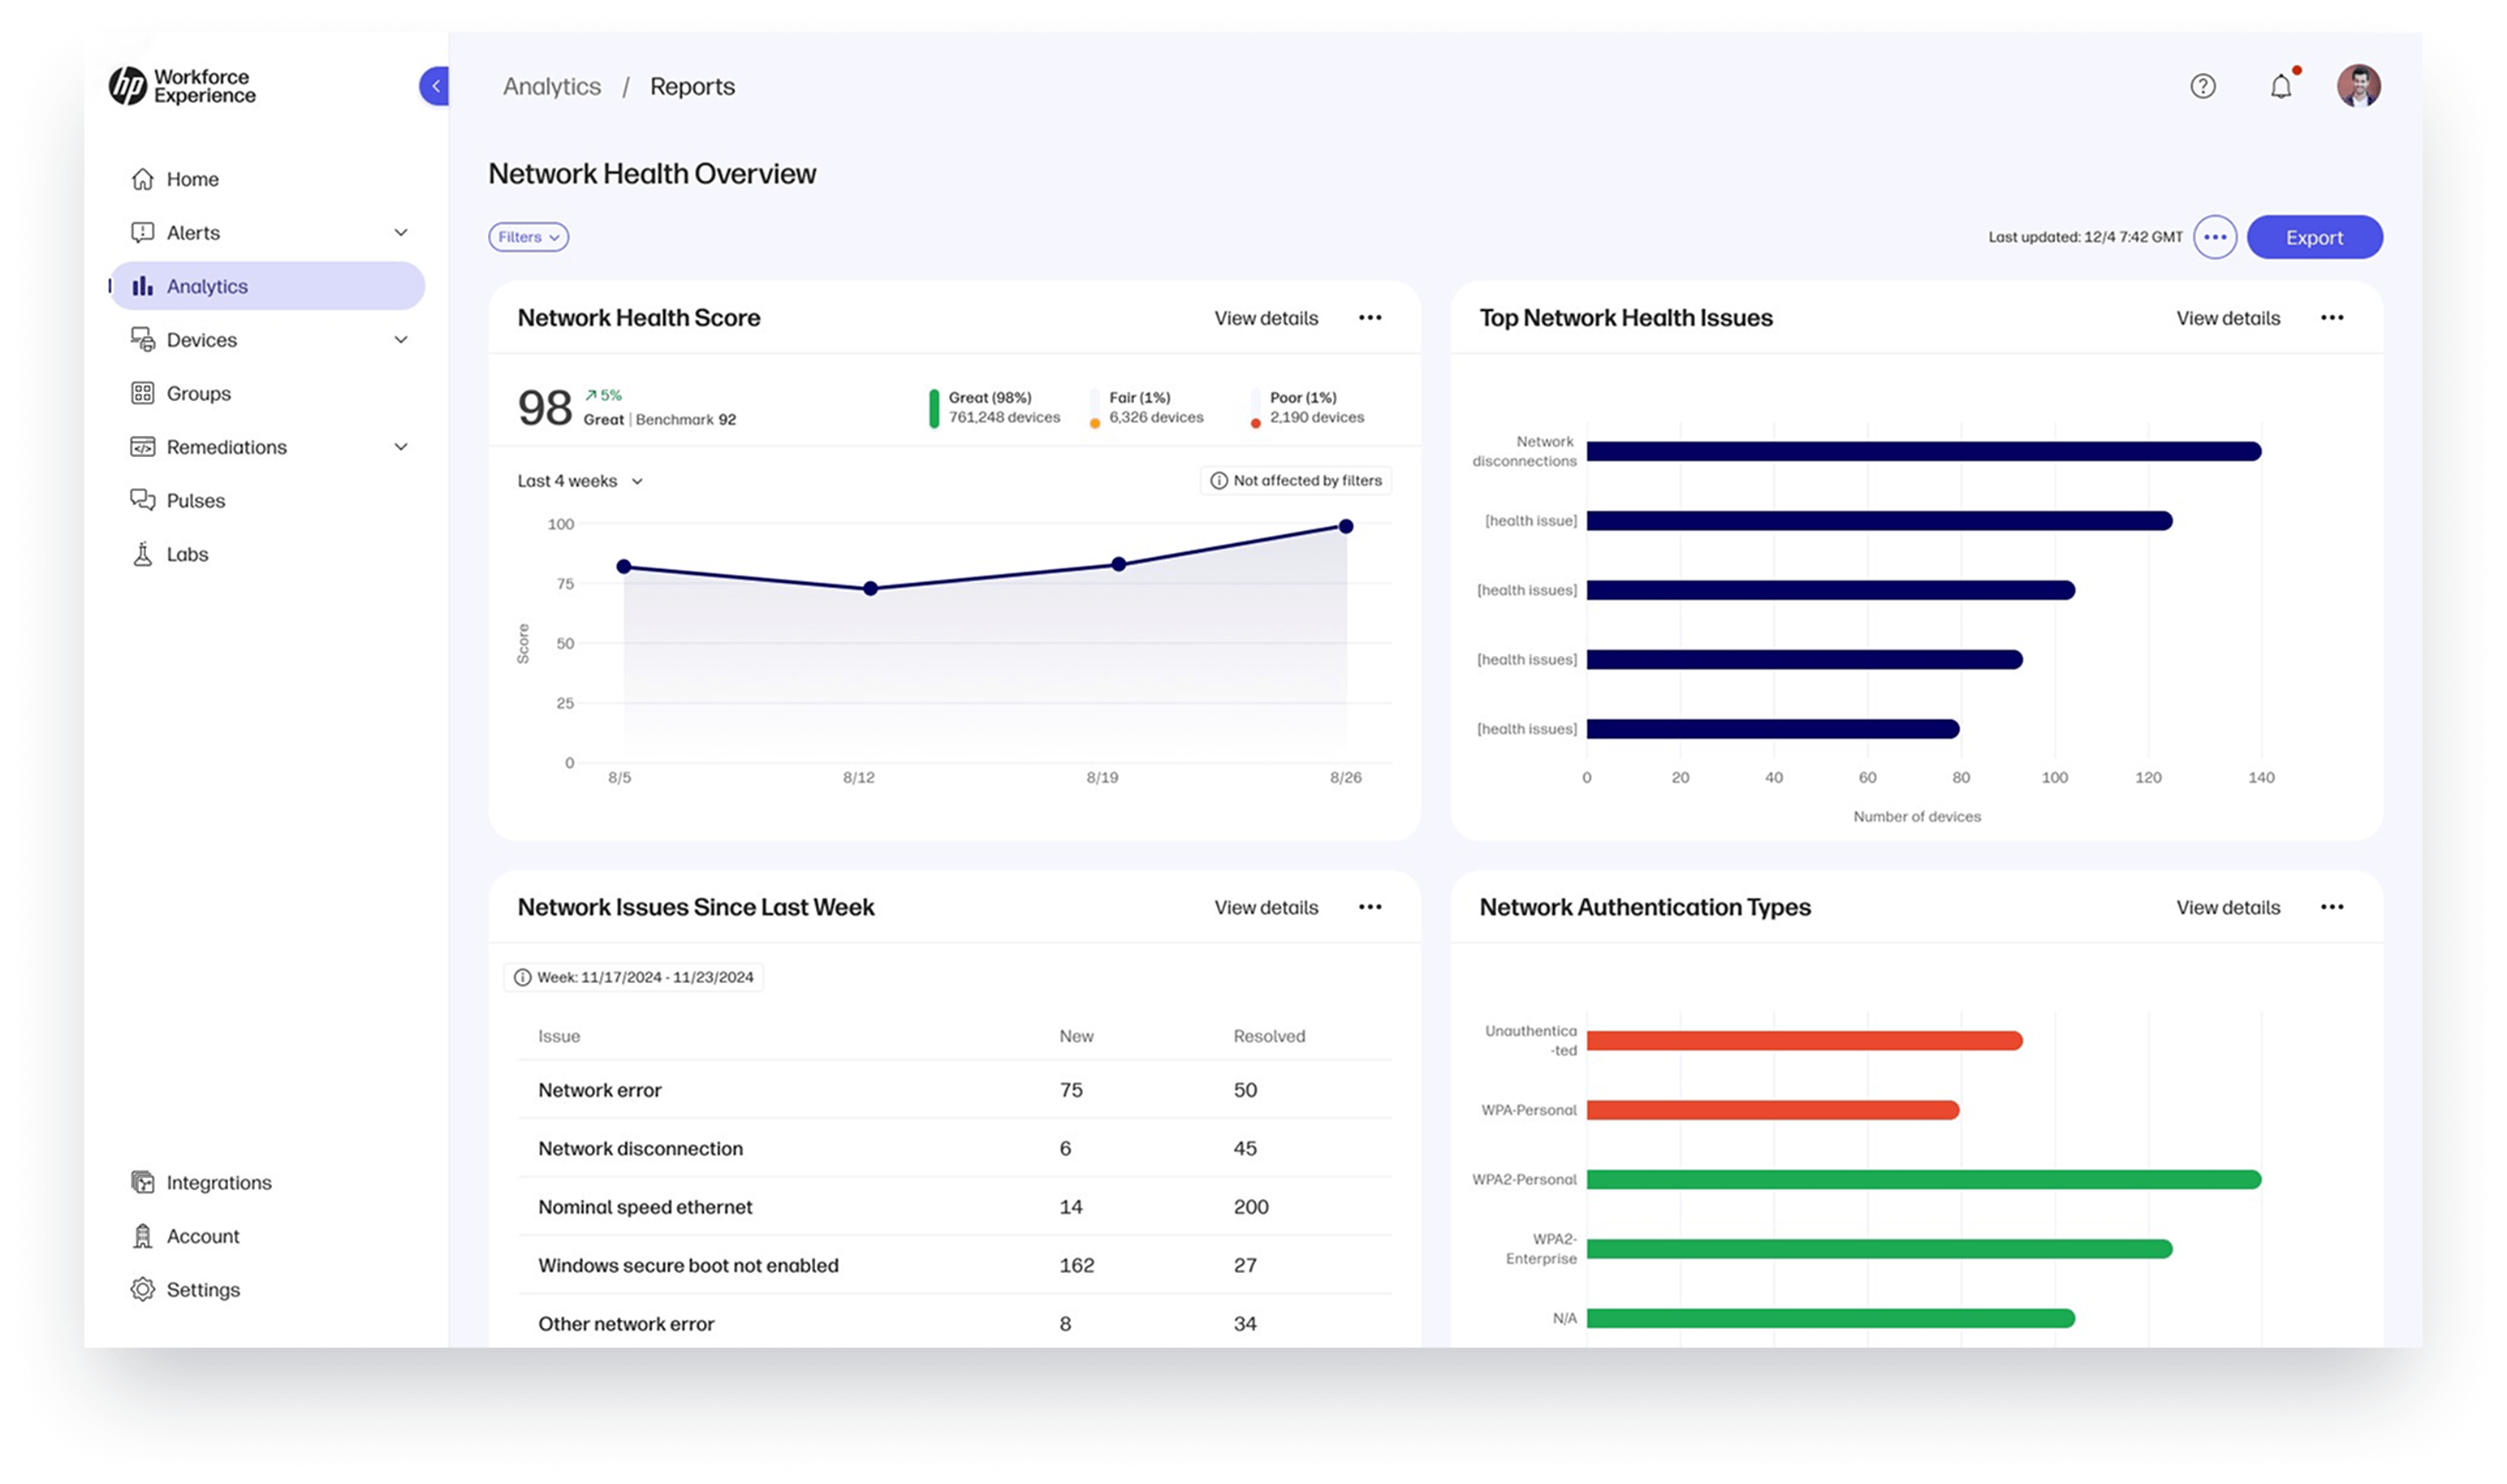
The new Network Health Overview dashboard highlights top network health issues and a single, easy-to-understand network health score tracked over time. Gain actionable insights into network performance, authentication types, and device-level metrics, like signal strength and speed, to proactively detect and resolve issues.
Steps to access:
- Go to Analytics on the left navigation menu.
- Select Network Score Overview in the Reports section of the Analytics page.
Installed application inventory
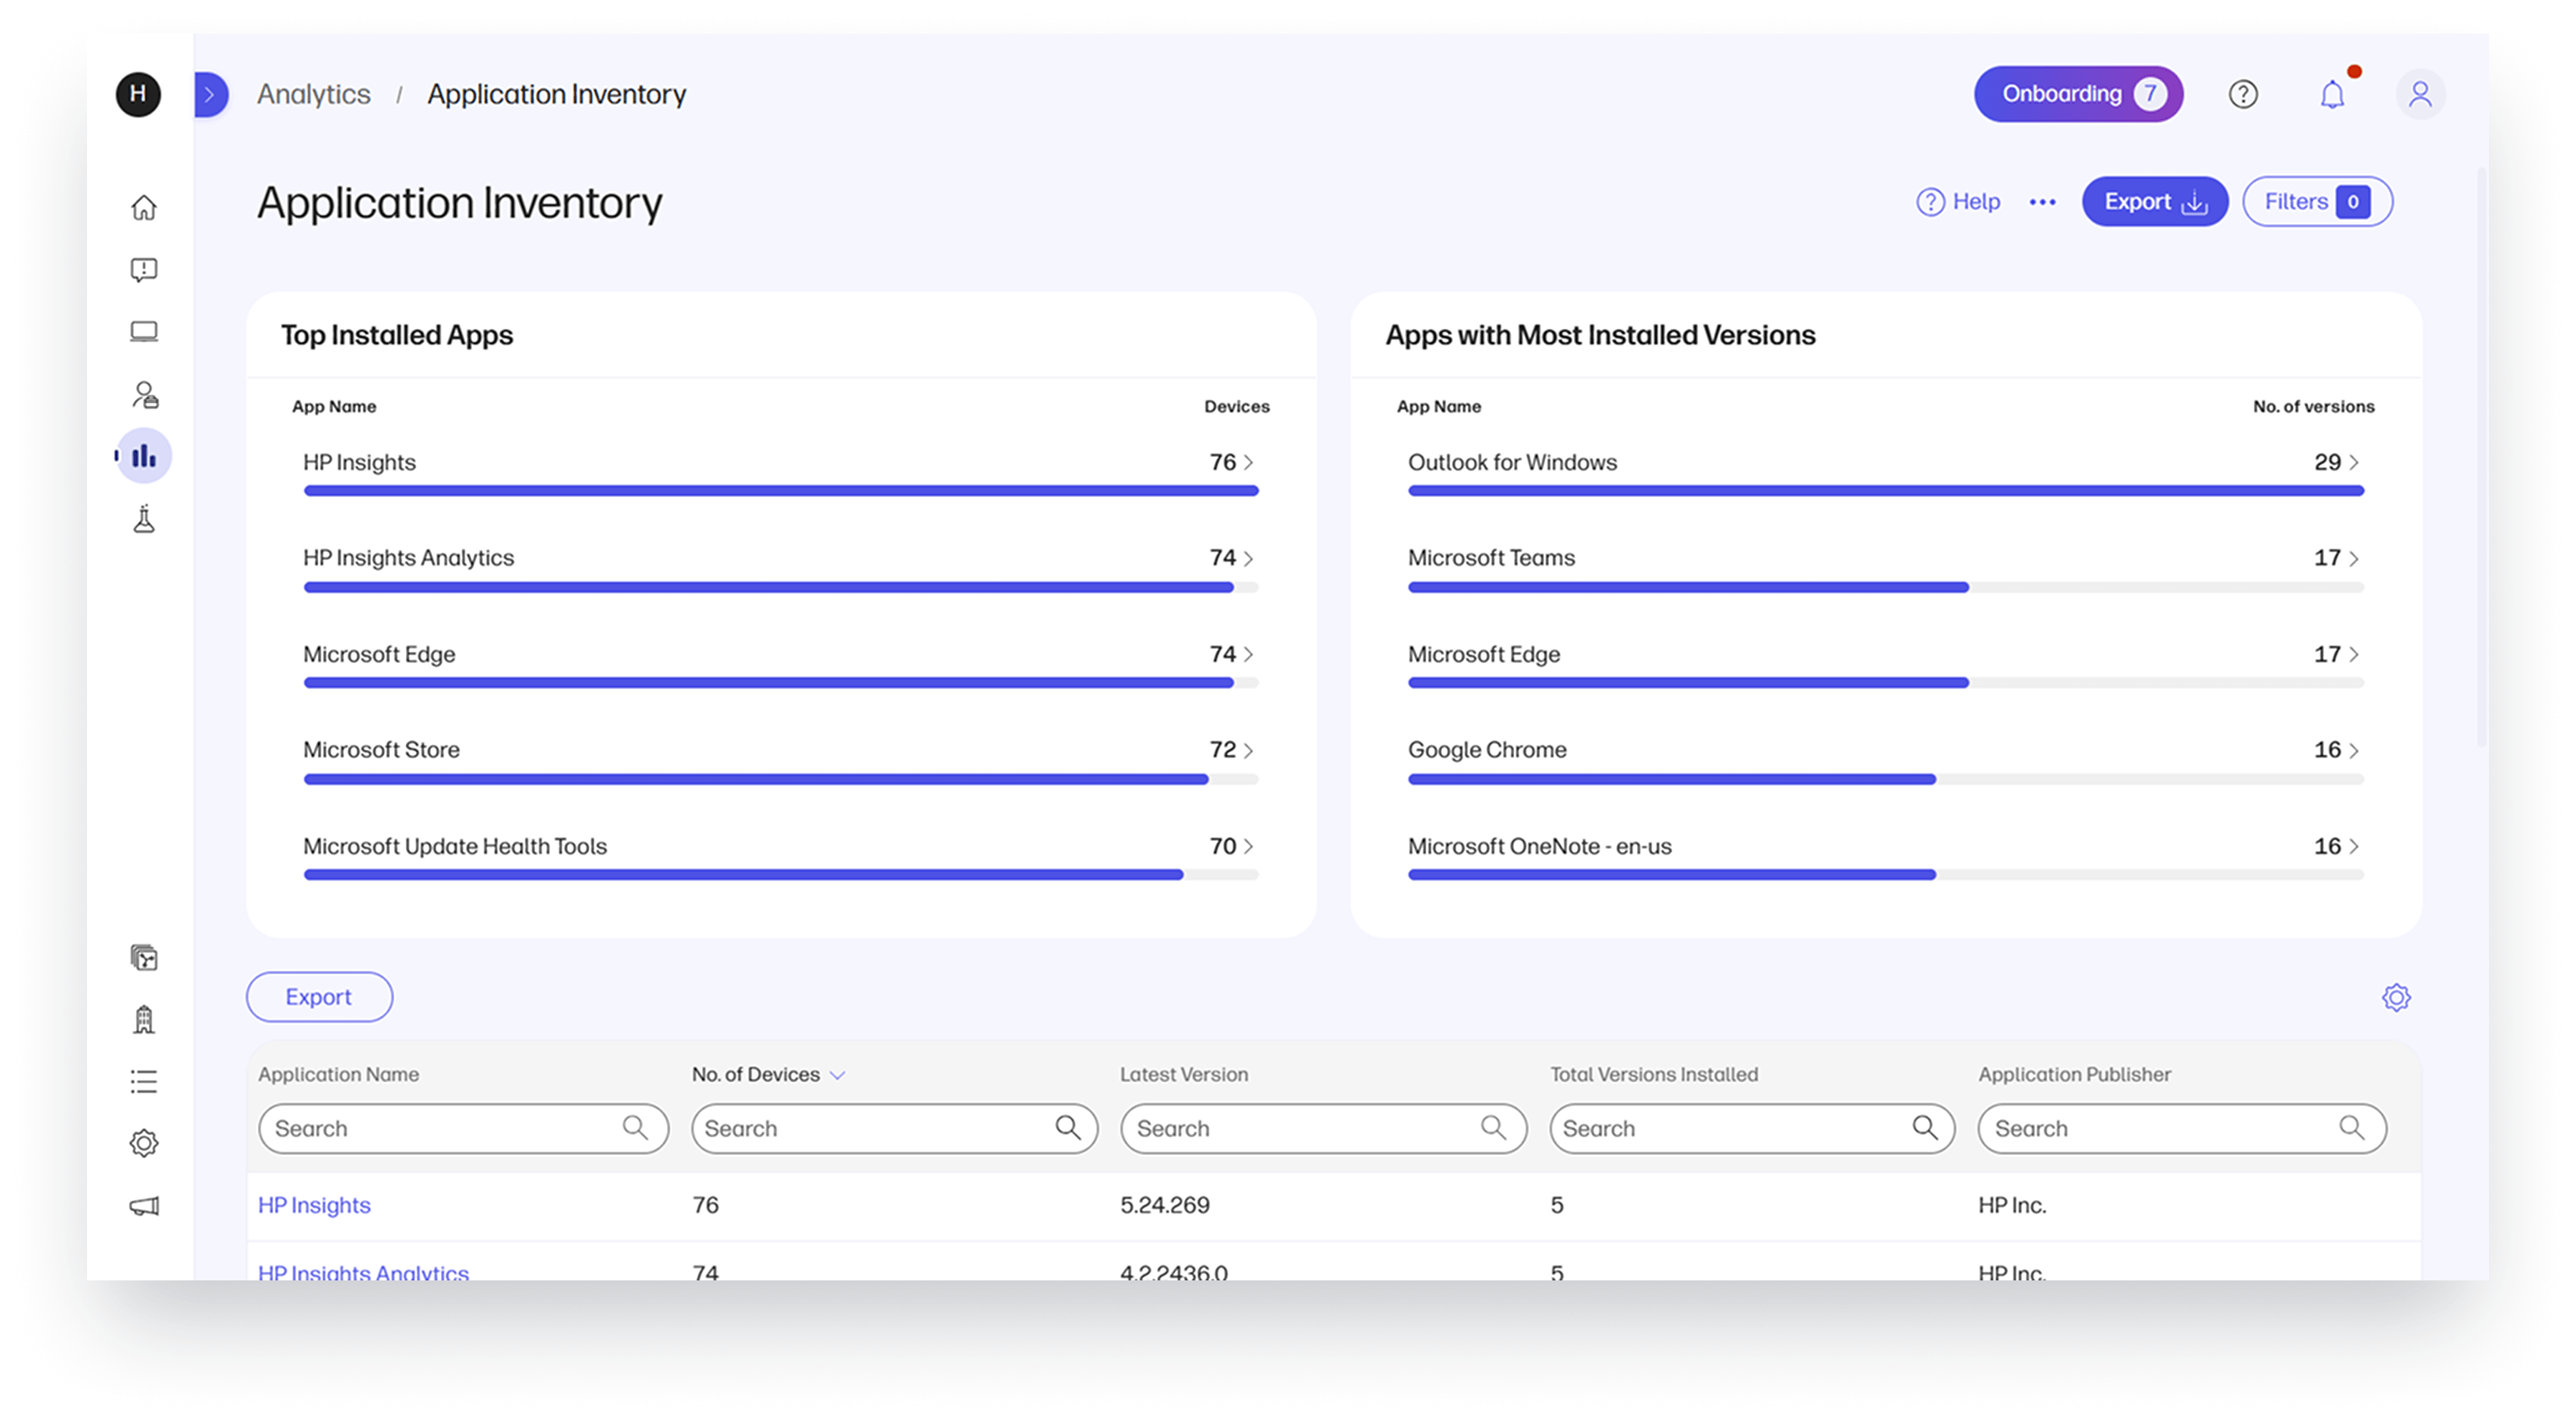
The Installed Application Inventory Dashboard provides real-time visibility into software across your device fleet. Easily track the latest app versions, filter and sort data, and export inventory. View top apps, installation counts, and version details, and dive deeper for device-specific insights like installation date and device model.
Steps to access:
- Go to Analytics on the left navigation menu.
- Select Application Inventory in the Reports section of the Analytics page.
Installed application performance and score
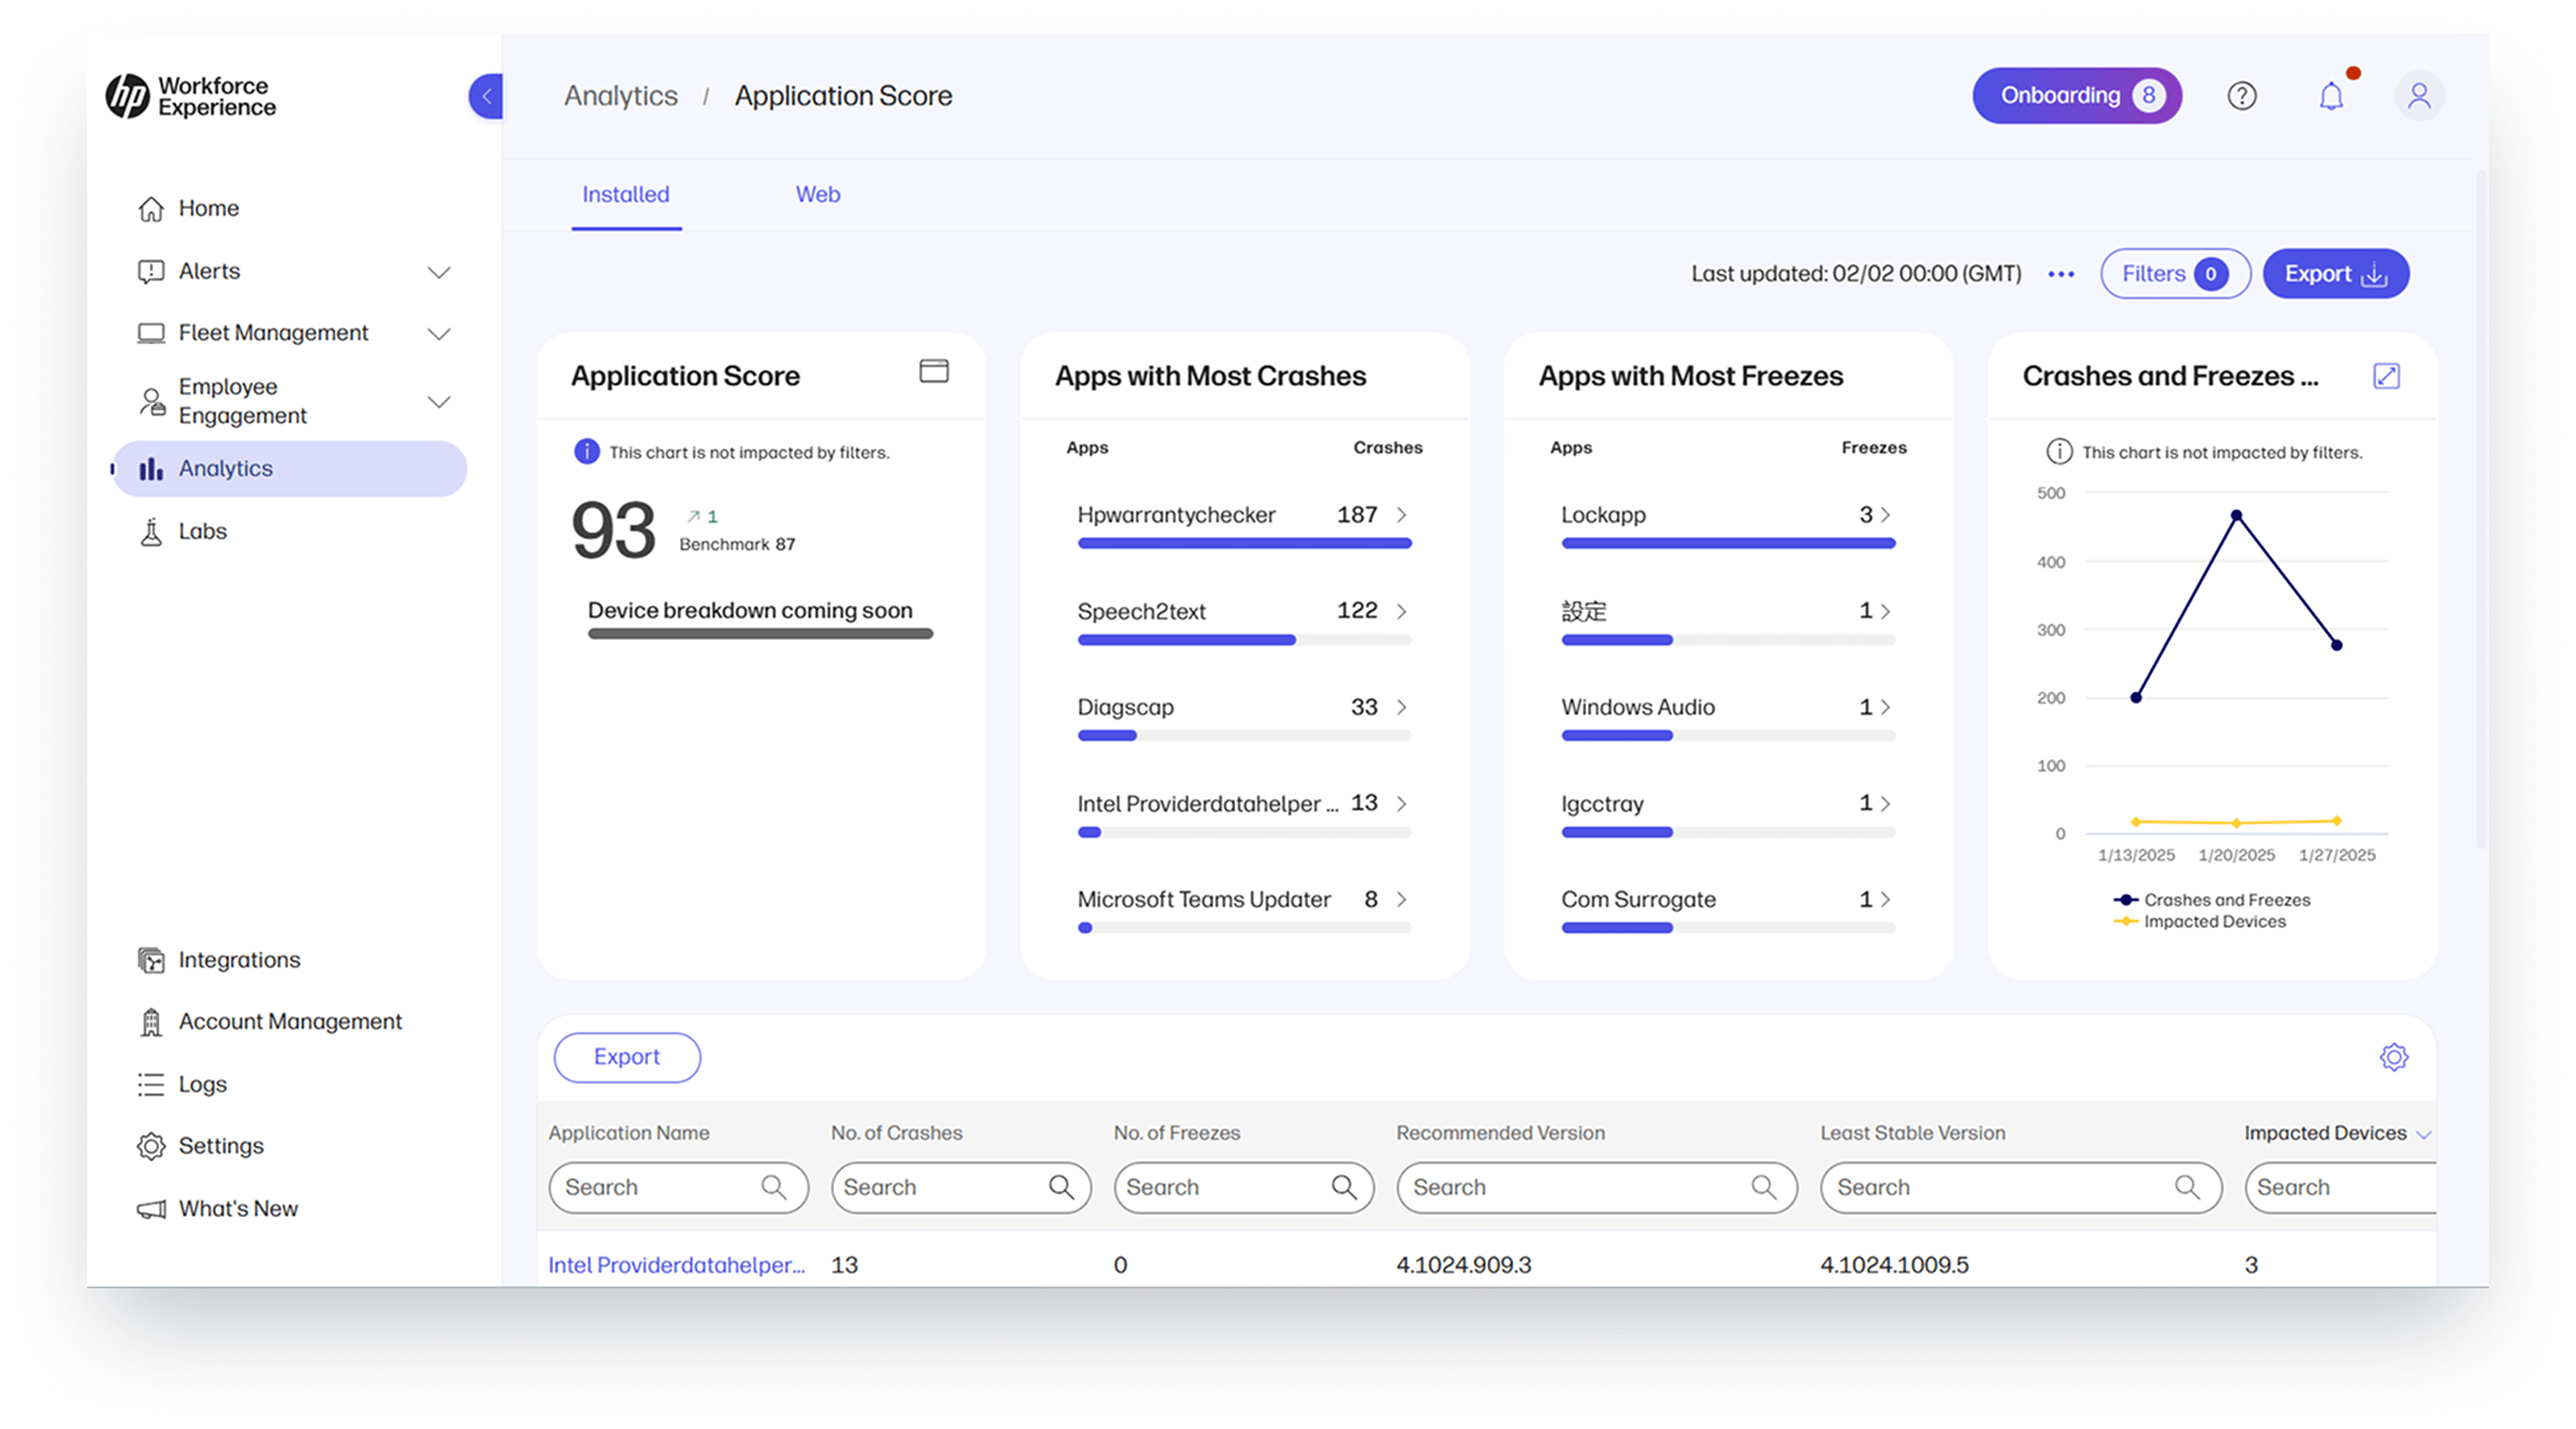
The Application Experience Dashboard helps you identify and track health issues of installed apps, with a focus on crashes and freezes. Visualize key metrics like affected apps, versions, and devices, with widgets for top issues and trends over time. Dive deeper into each app for version-specific insights and recommendations to improve stability and optimize user experience.
Steps to access:
- Go to Analytics on the left navigation menu.
- Select Application Experience in the Reports section of the Analytics page.
Hardware Asset Management
Bulk editing of custom device attributes
You can now create and bulk edit custom fields for devices, allowing for more effective data organization and management tailored to your organization’s specific needs. Up to five custom fields can be added per device, with the option to populate them either directly on a device’s details page or through a bulk CSV upload.
This enhancement improves reporting capabilities, boosts searchability, and ensures that device attributes align with your operational requirements, leading to more informed insights and quicker decision-making.
Steps to access:
To create custom fields
- Go to the Settings tab on the left navigation menu.
- Click on the Preferences tab.
- Scroll down to Custom Fields for devices.
- Click the pencil icon to add up to five custom fields.
To populate custom fields
- Navigate to the Fleet Management > Devices > PC Table and notice your custom field headers.
- The values for these custom fields can be populated either on the device’s details page or in bulk via a CSV file.
- To bulk update the custom fields via CSV file, select all the rows you want to add a custom field attribute and select Export.
- Select the second option, to export All Editable Fields and download your CSV file.
- Populate the custom field attributes in the CSV and save them as CSV.
- Click Add in the top left of the Fleet Management > Devices > PCs Table.
- Select Add and Track Physical Assets and upload your CSV file containing the custom field attributes. Once the upload is completed, the custom fields will be populated in the list page.
Alternatively,
- Go to Fleet Management > Devices > PCs.
- Click on a specific device you would like to update.
- Find the custom field on the Overview tab and click the pencil icon to update the value.
Management of non-telemetry devices
You can now add physical assets (devices that do not send telemetry information) to our platform. No more juggling multiple disparate systems — get full visibility across all your IT assets, both telemetry-enabled devices and non-telemetry assets in one place.
By consolidating the management of all devices in one platform, you gain a comprehensive view of your IT ecosystem, making it easier to track, organize, and report on assets. This streamlined approach enhances operational efficiency, simplifies maintenance and support, and ensures that all assets, regardless of their telemetry capabilities, are accounted for and effectively managed.
Steps to access:
- Go to Fleet Management on the left navigation menu.
- Click on Devices.
- Select Add.
- Select Track Physical Assets to add non-telemetry, physical assets via CSV upload.
Priority device enrollment queue
When you are onboarding new customers or running demos, efficiency is key! The priority enrollment queue ensures high-priority tasks get processed first — even during large-scale enrollments — so critical activities are not delayed by regular device enrollments. This improves platform efficiency and maintains a smooth user experience to boost customer satisfaction and retention.
Steps to access:
- Download and install the HP Insights application on your device.
- Follow the prompts to begin the enrollment process in the platform.
- Click Agree in the enrollment confirmation window.
- After successful enrollment, the HP Insights Agent will show as Enrolled in the Windows System Tray.
- The device will appear as HP Insights in the portal.
Employee Engagement and Sentiment
AI-generated summary for free text survey responses
Drowning in survey responses? Let AI do the heavy lifting! Our new AI-powered summaries analyze open-text feedback, identify common themes, and gauge sentiment (positive, neutral, or negative) — so you get actionable insights without sifting through hundreds of comments. As a result, your IT teams can respond effectively, save time, and make data-driven decisions, even in large organizations with extensive survey data.
Steps to access:
- Go to Employee Engagement on the left navigation menu and select Pulses.
- Click Create and select Custom Pulse from the dropdown.
- Send a Custom Pulse survey to employees in your organization that includes at least one Comment Box question type.
- After receiving at least 100 individual responses, an AI-generated summary will automatically display on the Pulse results page. It can take up to 24 hours for this to be processed.
Send urgent pulse notifications to employees
Need to send a critical IT update? Urgent Pulses cut through the noise—ensuring messages reach employees instantly, even if they are screen-sharing, on a call, or in Do Not Disturb mode. The system prioritizes the delivery of urgent pulses, ensuring they are sent immediately, regardless of other previously sent pulses, due to the critical nature of the information.
* We recommend using urgent pulses sparingly and only for sharing time-sensitive, critical information with employees to maintain their impact and avoid notification fatigue.
Steps to access:
- Go to Employee Engagement on the left navigation menu and select Pulses.
- Click Create and select Custom Pulse from the dropdown.
- Under the Schedule tab, select Date-based and set the Priority as Urgent.
Autosave and duplicate pulses
Say goodbye to lost work. Autosave ensures your pulse changes are saved in real time, while Duplicate lets you quickly create variations or reuse content — because efficiency matters.
Steps to access:
- Go to Employee Engagement on the left navigation menu and click Pulses.
- There are two ways to duplicate a pulse. Either (1) on the Pulse list page, select the checkbox next to desired pulse and click Duplicate, or (2) click into the desired pulse and select Duplicate under the Actions dropdown on the Results page.
Third-Party Integrations
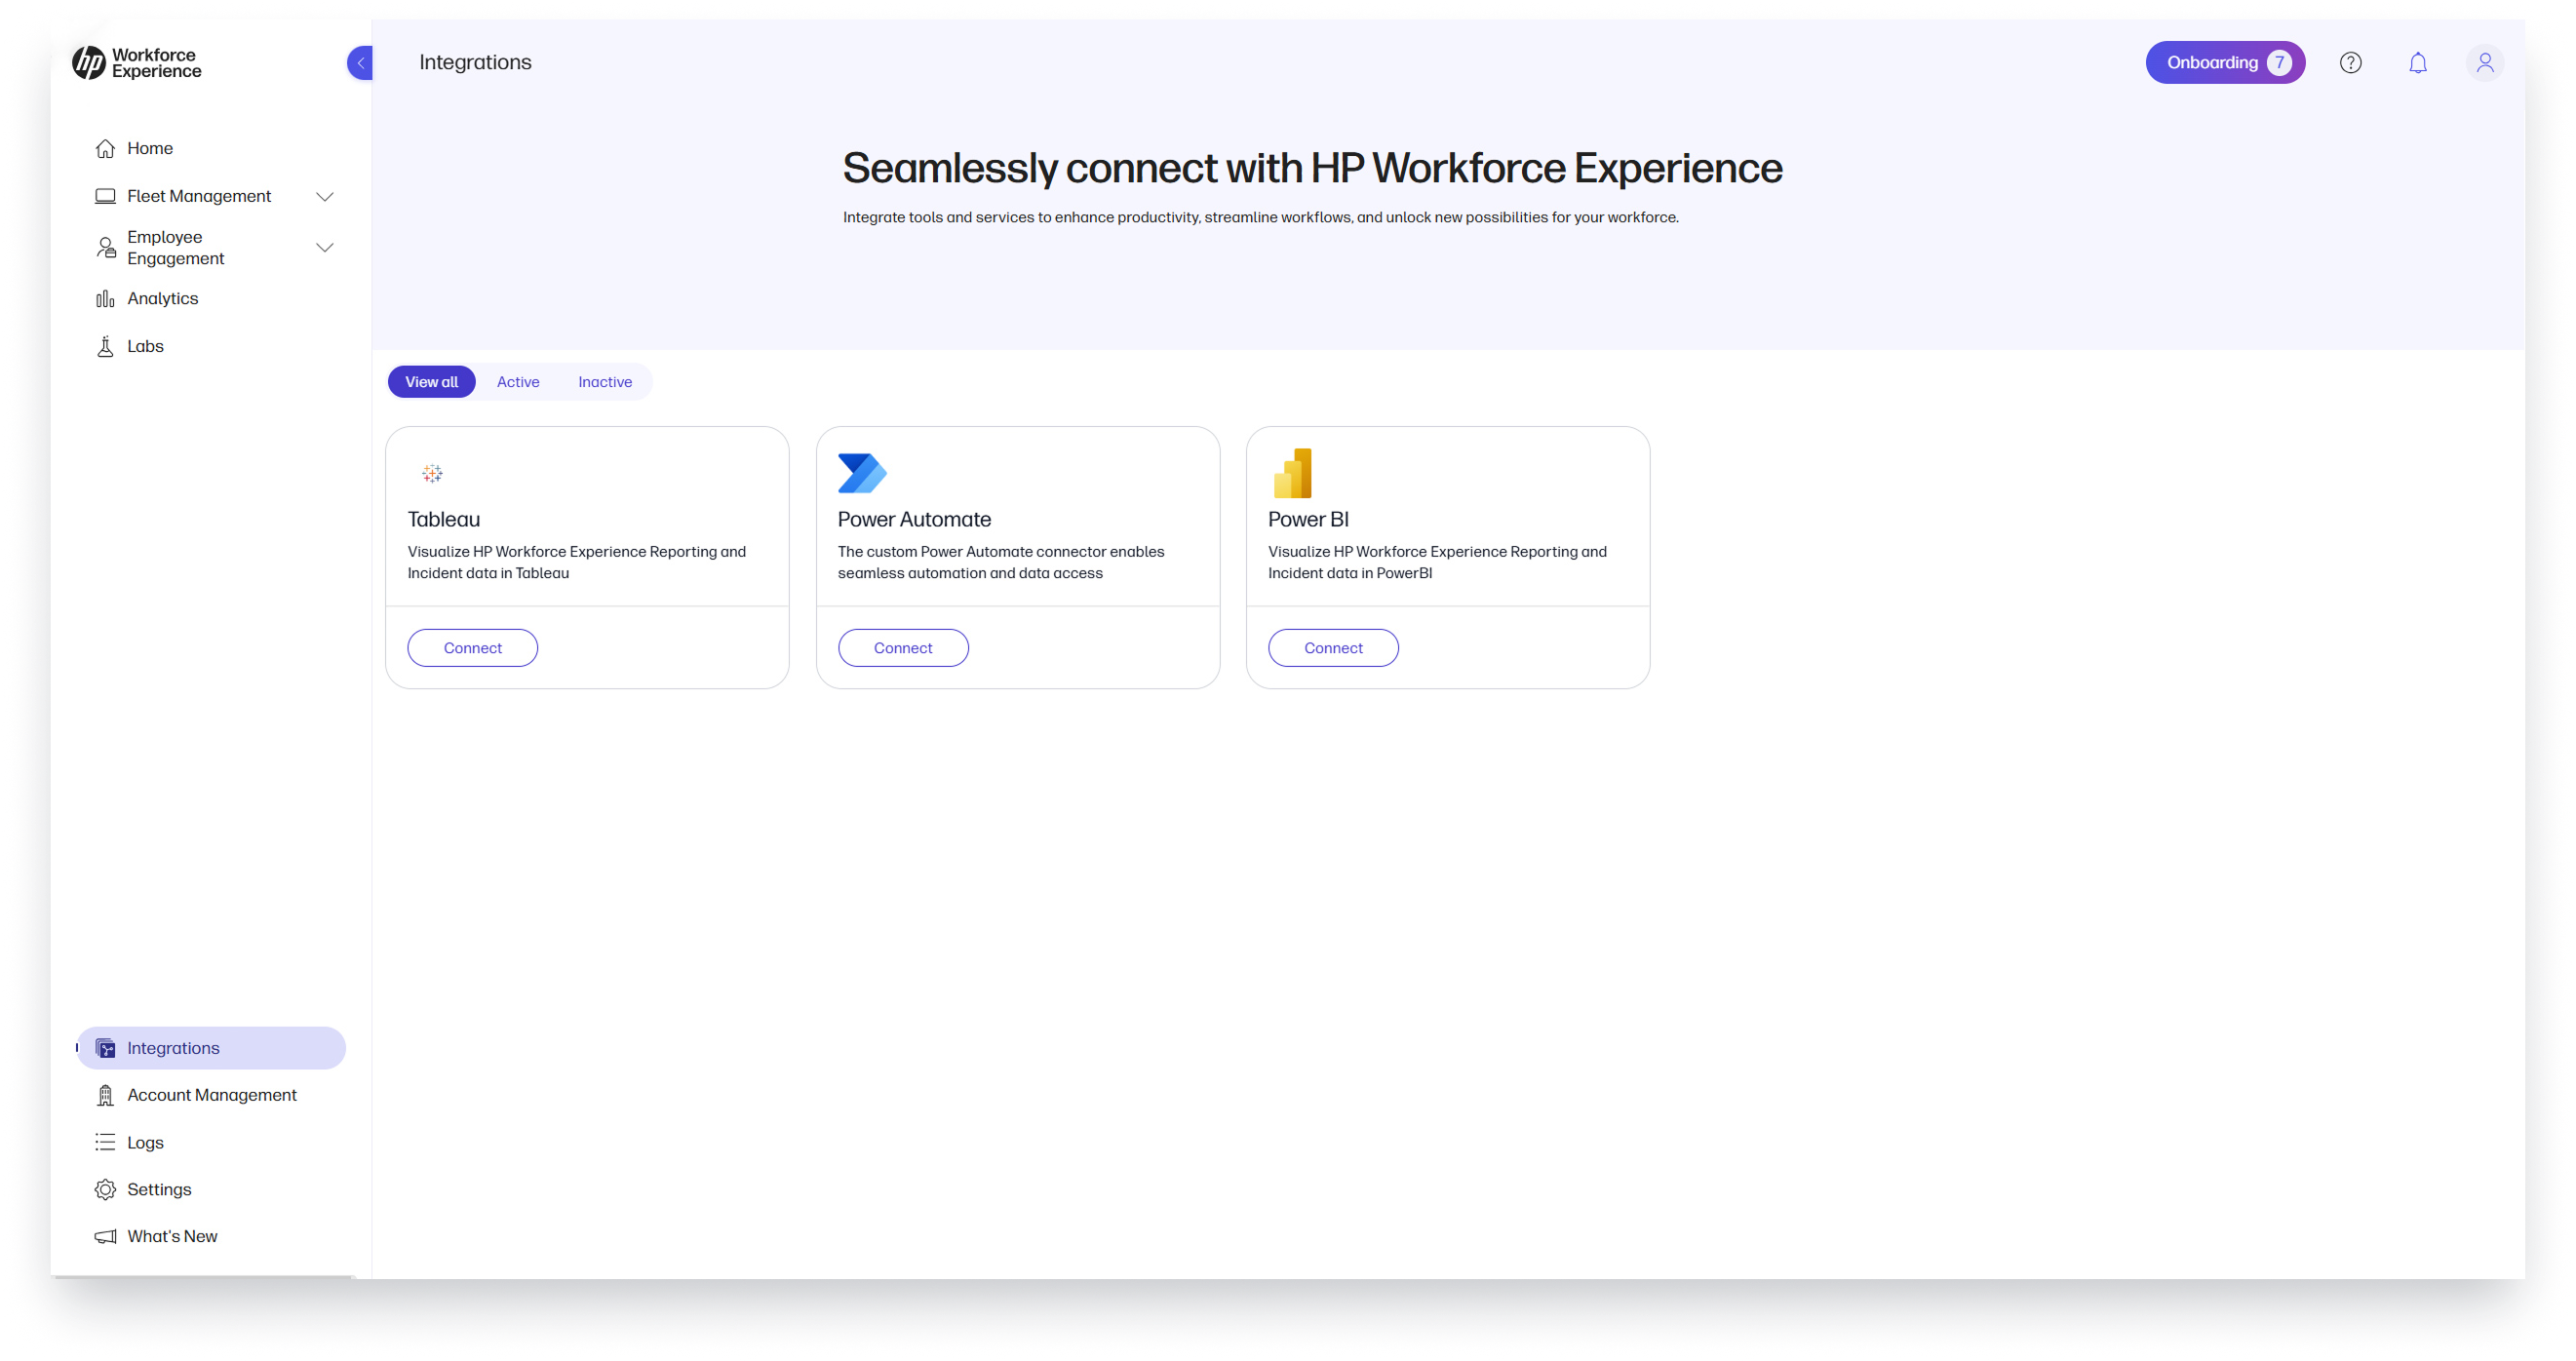
WXP now integrates seamlessly with Power BI, Tableau, and Power Automate, providing you with powerful tools to elevate your data analysis, reporting, and automation processes. These integrations make it easier than ever to export data, create dynamic visualizations, and automate critical workflows—ultimately boosting your productivity and helping you make smarter, data-driven decisions.
Power BI connector
Easily export WXP data to Power BI for advanced analysis and reporting. This integration enables you to automate data refreshes, create custom reports, and segment data by company, department, and other key attributes. With Power BI, unlock deeper insights and make data-driven decisions through customizable visualizations and automated reporting tailored to your business.
Steps to access:
- Click the Integrations page on the left navigation menu.
- Select the Power BI Connector card to activate the connector.
Tableau connector
Integrate WXP with Tableau to create dynamic visualizations and interactive dashboards for advanced data analysis. This integration lets you seamlessly extract and analyze WXP data, blending it with other data sources. Use Tableau’s drag-and-drop interface to build customized reports, uncover actionable insights, and share findings across your organization, all in real-time.
Steps to access:
- Click the Integrations page on the left navigation menu.
- Select the Tableau Connector card to activate the connector.
Power Automate connector
Automate workflows and streamline data access with the WXP Power Automate connector. This integration enables powerful automation and data-driven processes, such as automating data refreshes and custom report generation, significantly boosting productivity and enhancing the efficiency of your business operations.
Steps to access:
- Click the Integrations page on the left navigation menu.
- Select the Power Automate Connector card to activate the connector.
Partner Experience
Brand customization
Add your unique company logo to the platform to ensure a seamless brand experience across the user interface and communications.
Steps to access:
- Click the Settings tab on the left navigation menu.
- Click the Customization tab on the Settings page.
- Upload your logo.
Endpoints growth widget
Track your business growth at a glance. View the total number of endpoints under management directly from the home screen to gauge adoption rates, identify trends, and make quick, data-driven decisions to further scale your operations.
Steps to access:
- Click on the Home tab on the left navigation menu.
- Scroll down until you see the endpoints growth widget.
Custom help and support
No one knows your business the way you do — tailor your customer support within WXP. Redirect your users to your support platform or enable email-based ticket submissions, offering a customized support journey that integrates seamlessly with your existing processes. This feature allows for efficient support handling while maintaining consistency across interactions.
Steps to access:
- Click the Settings tab on the left navigation menu.
- Click the Customization tab on the Settings page.
- Toggle ON the customized Help & Support option.
- Define which Help & Support method you would like to use.
Email signature customization
Keep communications on-brand by adding standardized, customizable email signatures. Automatically append your brand’s signatures to all outgoing platform communications, reinforcing professionalism, and brand consistency across every customer interaction.
Steps to access:
- Click the Settings tab on the left navigation menu.
- Click the Customization tab on the Settings page.
- Edit the email signature field.
- Save your new signature.
Windows Defender signature update
Simplify security management with the ability to update Windows Defender signatures across multiple customer devices with just one click. This feature helps you manage device security more effectively, ensuring that your entire customer base is protected against potential vulnerabilities.
Steps to access:
- Identify the alert associated with customers’ devices missing Windows Defender signature.
- Click on the alert.
- Select to Resolve for a specific customer or select Details to see further details on a customer.
- Determine for which devices you would like to have Windows Defender signature updated.
- Click Resolve.
- Confirm action.
Account Management and Subscriptions
HP Anyware add-on subscription
Easily add an HP Anyware subscription to enable secure, seamless access to remote and virtual desktops — no VPN required. Included with an HP Anyware subscription is HP Anyware Manager Enterprise, to help IT teams efficiently configure, monitor, and scale remote desktop environments with ease.
Enjoy a 30-day free trial with no commitment, and benefit from flexible monthly billing that adapts to your growing needs.
Steps to access:
- Go to the Account Management page on the left navigation menu.
- Select the Add-ons tab.
- Click Learn More on the HP Anyware add-on.
- Complete your subscription agreement in the Azure Marketplace.
Self-Onboarding and Support
Onboarding checklist
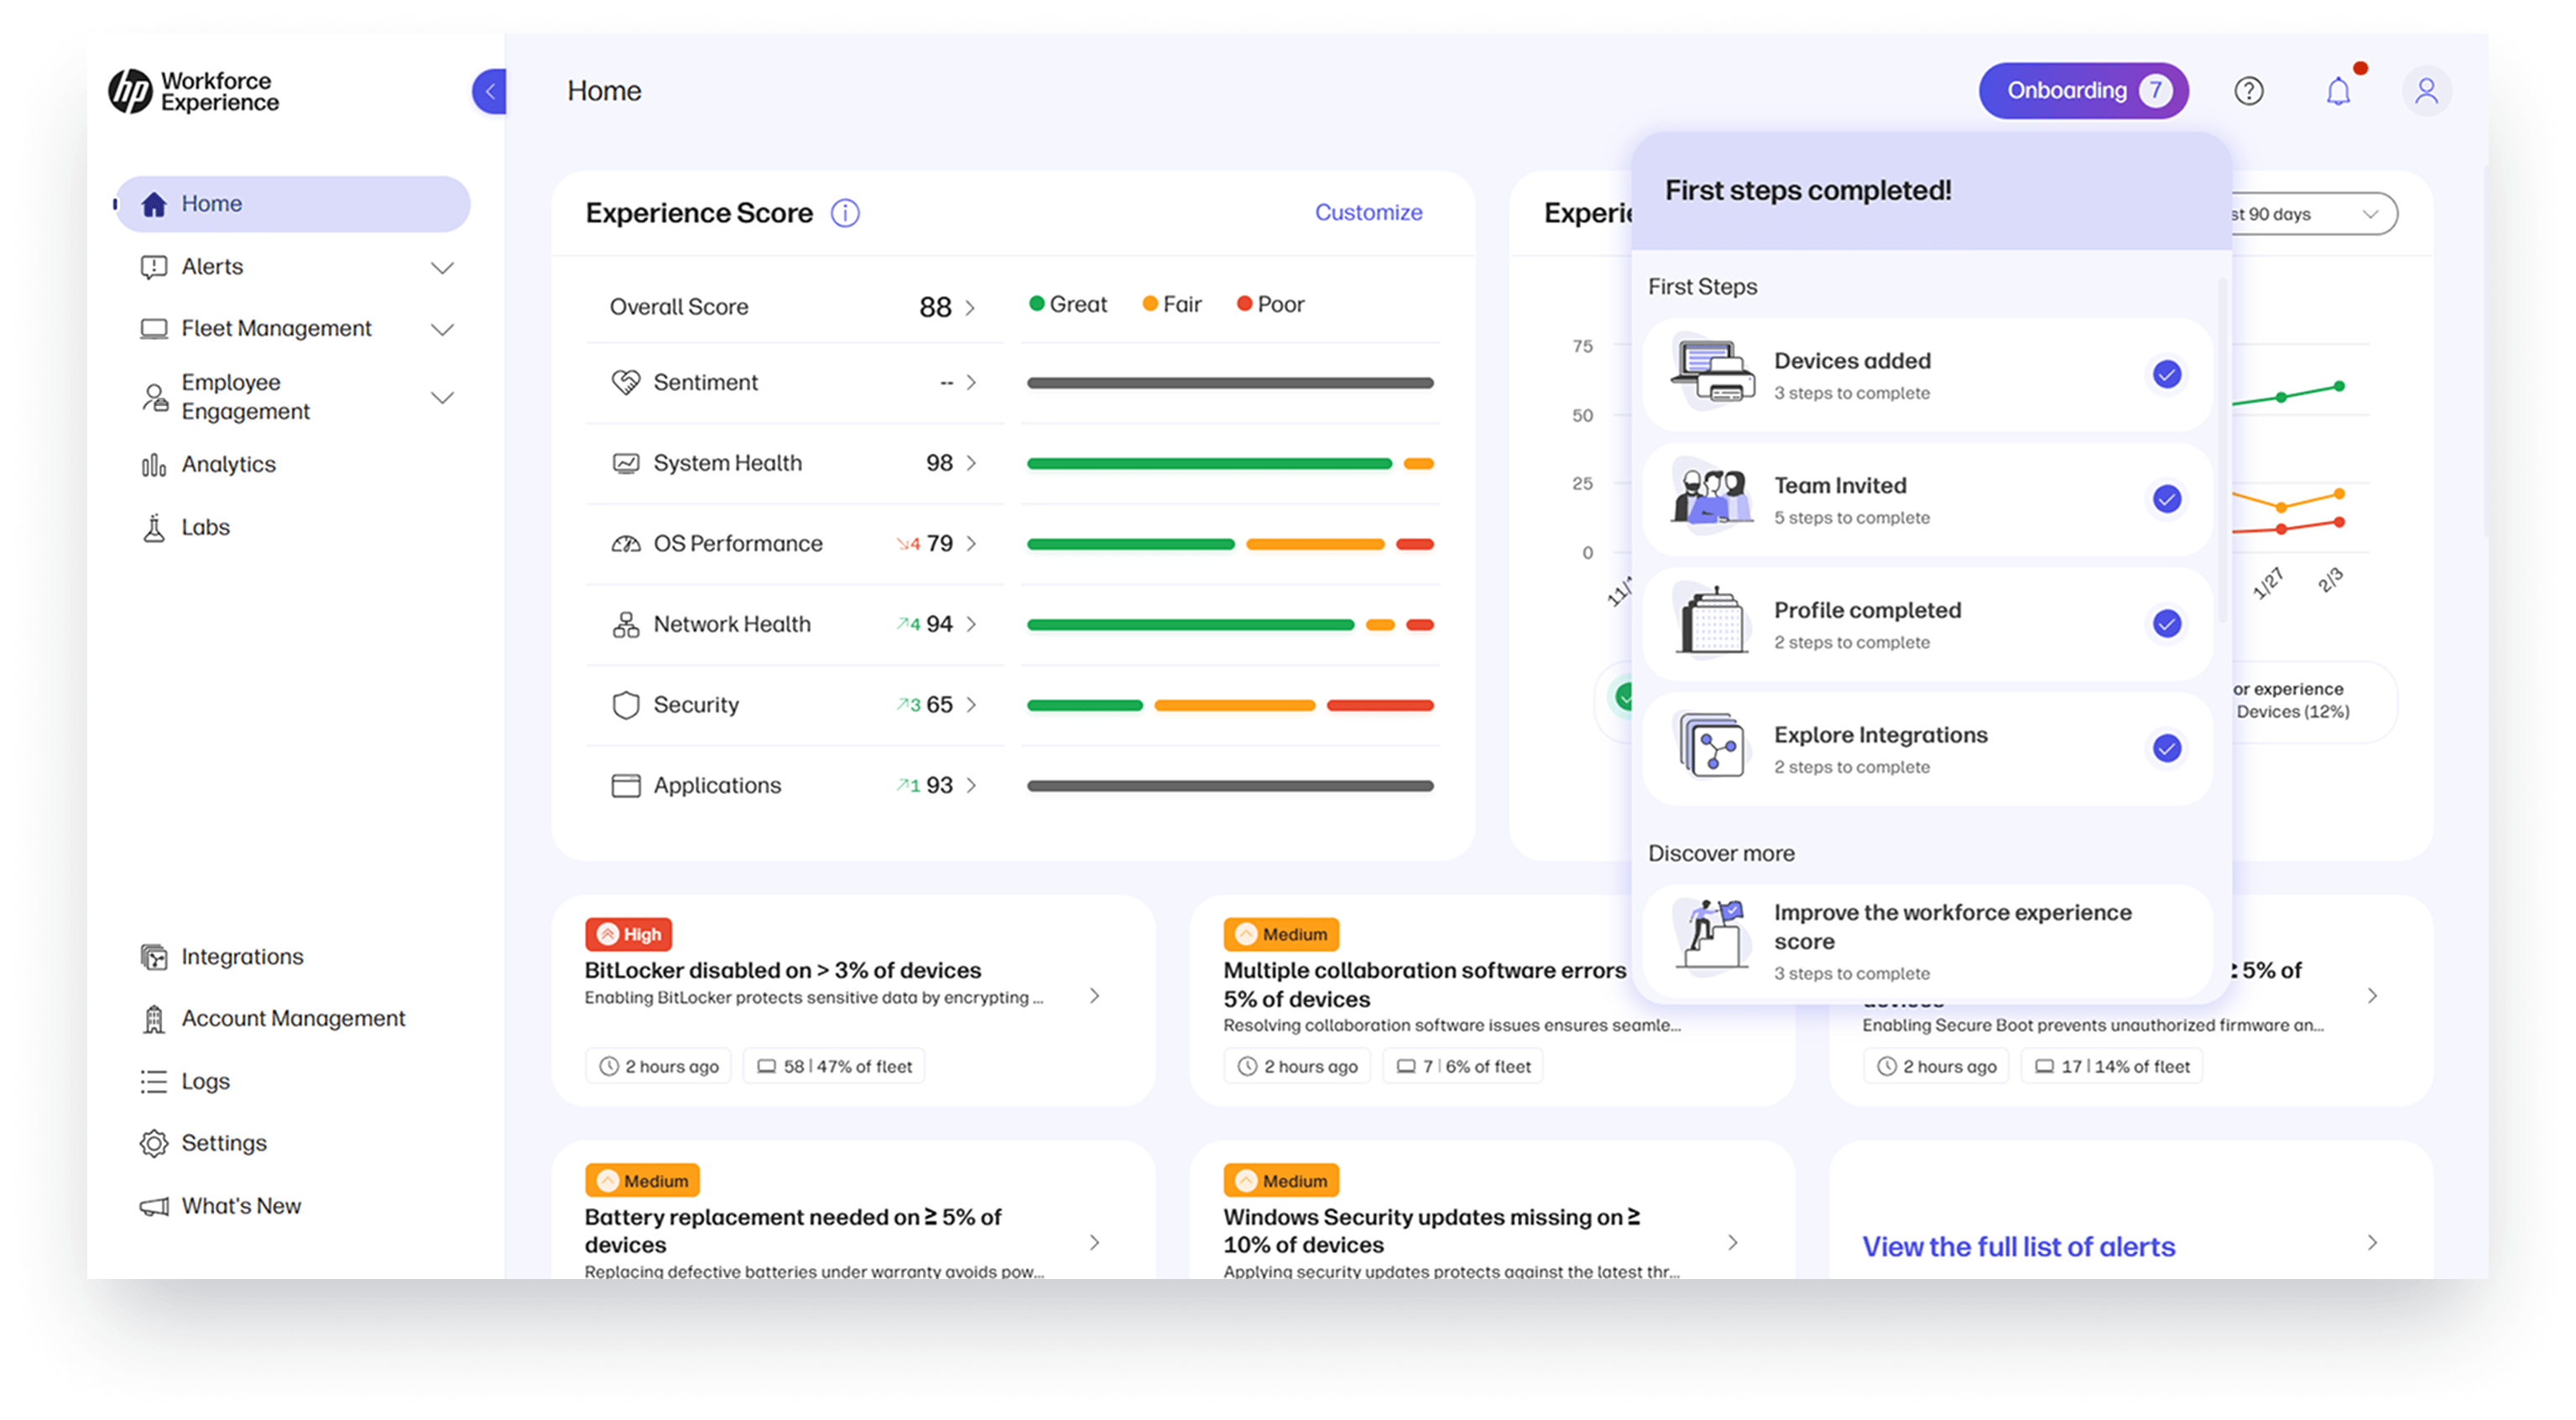
Are you new to the HP Workforce Experience platform? Our onboarding checklist helps you hit the ground running. After completing the four core onboarding steps (add devices, invite your team, complete your profile, and explore integrations), you can explore additional features to boost productivity, streamline IT operations, enhance employee satisfaction, accelerate issue resolution, and deliver personalized experiences.
Steps to access:
- Click the Onboarding button in the top-right corner of the global navigation.
- Follow the guided steps to complete the four foundational tasks: add devices, invite your team, complete your profile, and explore integrations.
Once completed, you can explore additional features to unlock the full potential of WXP.
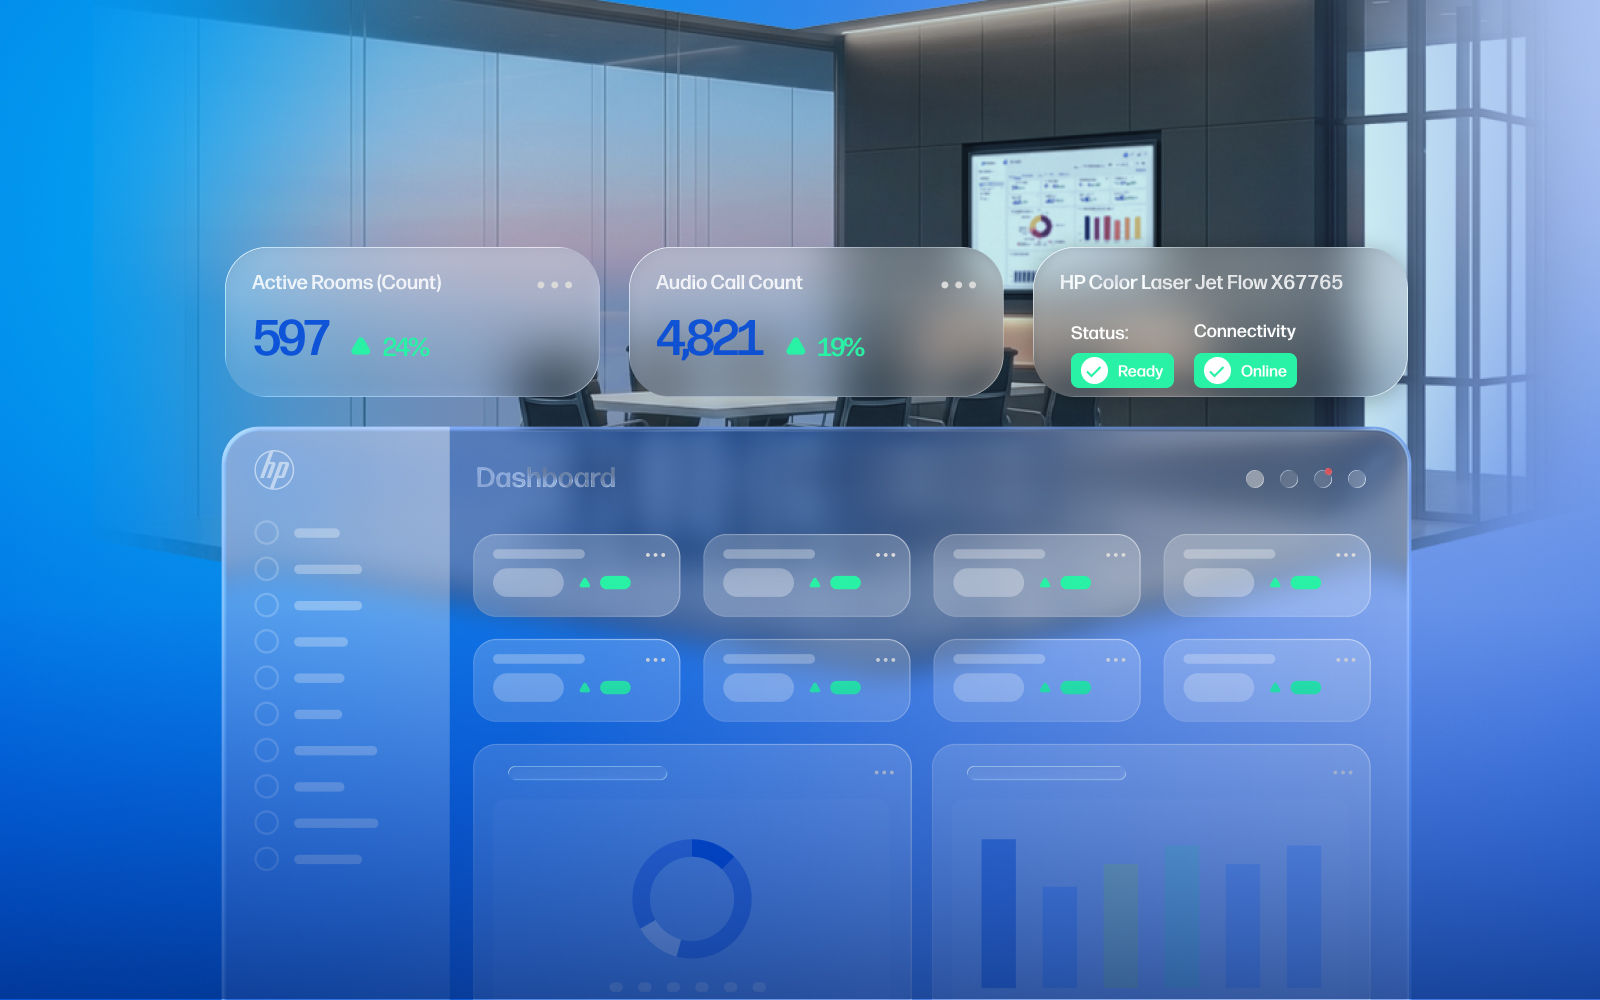
Printers’ integration¹
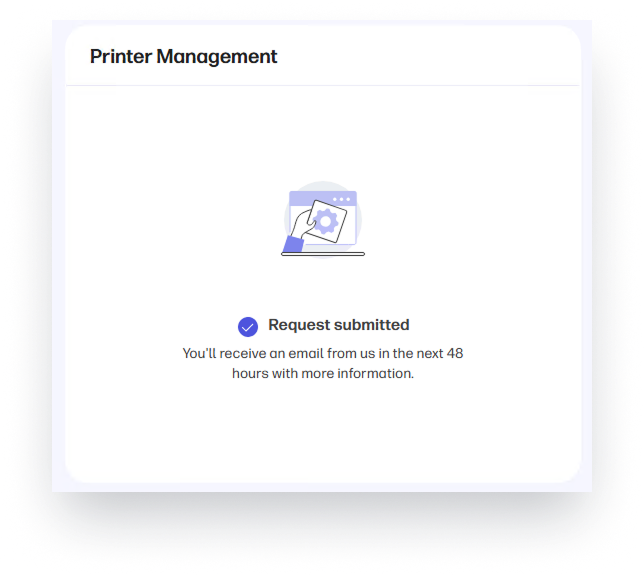
Managing printers just got easier. With the integration of printers, you can manage both PCs and printers within a single platform, eliminating the need for separate tools and simplifying your IT workflows.
Steps to access:
- Click on Fleet Management on the left navigation menu.
- Select the submit request button on the Print management widget.
- Once approved, you’ll receive a notification from WXP letting you know your account is ready for print integration. You can then log back in to see the Print user interface ready for onboarding devices.
Feedback widget
Have ideas? Share them directly with our product development team using the new feedback widget on your home screen. Your insights and suggestions are valuable to continue evolving the HP Workforce Experience platform.
Steps to access:
- Click on the Home tab on the left navigation menu.
- Scroll down until you see the feedback widget.
HP Workforce Experience Platform is a comprehensive and modular digital employee experience solution that enables organizations to optimize IT for every employee’s needs.
Subscribe for future product release updates and the HP Workforce Experience Blog to learn how to optimize your IT capabilities today.
If you want to learn more about the HP Workforce Experience Platform, we would love to speak to you! Simply fill out the form below, and a team member will be in touch.
¹Print Add-On will be required to unlock print capabilities.
From the blog
The latest industry news, interviews, technologies, and resources.


Frequently asked questions
Here's everything you need to know about WXP.
- What is the HP Workforce Experience Platform (WXP)?
- How does WXP work?
- Can WXP be customized to fit specific business needs?
- How is WXP modular?
- Is WXP compatible with different vendors and operating systems?
- How does WXP integrate with other IT tools to provide a more comprehensive solution?
- What is a Workforce Experience score?
- How is AI used within WXP?
- How can I buy WXP and find out about new releases?
